
Hearing that your Invisalign treatment needs “buttons” can sound alarming. Here are Invisalign attachments explained: most of those tooth-colored bumps are small pieces of composite resin bonded to selected teeth. They help aligners grip teeth for planned movements. Some patients also need buttons for rubber bands. Chewies are removable tools that help aligners fit against the teeth. These are routine parts of an individualized treatment plan.
The names get mixed up, but the tools have different jobs. Knowing which one you have makes daily care much easier.
Invisalign attachments explained: what they look like and why they are used
An Invisalign attachment is a small raised shape on the front or side of a tooth. These tooth-colored bumps blend with your natural teeth, though one may show in close-up photos or certain lighting. The aligner has molded spaces that fit over the shapes. With the tray in place, you may see a slight change in its outline. With it out, you can feel a bump with your tongue.
Smooth plastic has limited grip on certain teeth. To rotate teeth or make other complex tooth movements, your orthodontist can plan an attachment whose shape helps the aligner direct force for precise tooth movement. These aligner attachments help move teeth as planned; other movements may work with aligners alone, so you may see bumps on only some of your teeth, or none.
“They work like handles, giving your clear aligners something to gently push on.” – Invisalign’s guide to attachments
Several attachments may simply mean the aligner needs grip on several teeth. The number alone does not reveal how difficult your treatment will be or how long it will take.
Attachments, buttons, and chewies are not the same thing
Patients sometimes call every raised piece a “button.” Invisalign attachments include shapes that help the tray grip teeth; an elastic button has a different job: holding a rubber band. A chewie stays in your hand or mouth only while you bite on it to seat a tray.
|
Tool |
What it looks like |
What it does |
Does it stay on your teeth? |
|---|---|---|---|
|
Attachment |
Small, usually tooth-colored composite shape under the aligner |
Gives the tray grip for a planned tooth movement |
Yes, until your orthodontist removes it |
|
Elastic button |
Small bonded knob or hook, sometimes tooth-colored or metal |
Anchors a rubber band used for a prescribed bite correction |
Yes, while it is needed |
|
Chewie |
Small, soft, handheld cylinder |
Helps press an aligner fully onto the teeth |
No, you use it and take it away |
A tray fits over an attachment, while an elastic button stays accessible for the band. If you wear elastics, have your orthodontist show you the right connection point. An ordinary attachment is not a substitute.
What are Invisalign buttons?
Elastic buttons are bonded anchors for rubber bands used to address certain bite issues. An attachment works beneath the tray to control tooth movement. Your orthodontist will show you where to connect bands if you need them. Since “button” can mean either piece in everyday conversation, ask which one the team means.
Do attachments make Invisalign more noticeable?
Attachments can show more than a tray alone, especially on front teeth or when you take the tray out. The composite matches your tooth color, but it is not invisible. Elastic buttons and rubber bands may be easier to spot. Tell your orthodontist if appearance concerns you before the plan is finalized, so you understand where the pieces need to go.
How are Invisalign attachments and buttons placed?
At your bonding visit, the team cleans and dries the selected teeth, then uses a template tray to position the composite resin. After a curing light hardens it, they lift off the template. Your treatment tray fits around the new shapes. An elastic button is bonded to a tooth as well, with room to connect a rubber band.
The team bonds these pieces to the tooth surface without surgery or, in general, an injection. You may notice the texture when your tongue touches a tooth. The aligner may also feel snug at first, and a new tray can cause brief soreness. Call your orthodontist if an edge cuts your cheek, pain is severe, or the tray will not fit.
Before you leave, have the team demonstrate how to remove and replace the trays without pulling against a bump. They can point out any elastic buttons and tell you whether to use chewies.
How do you use Invisalign chewies?
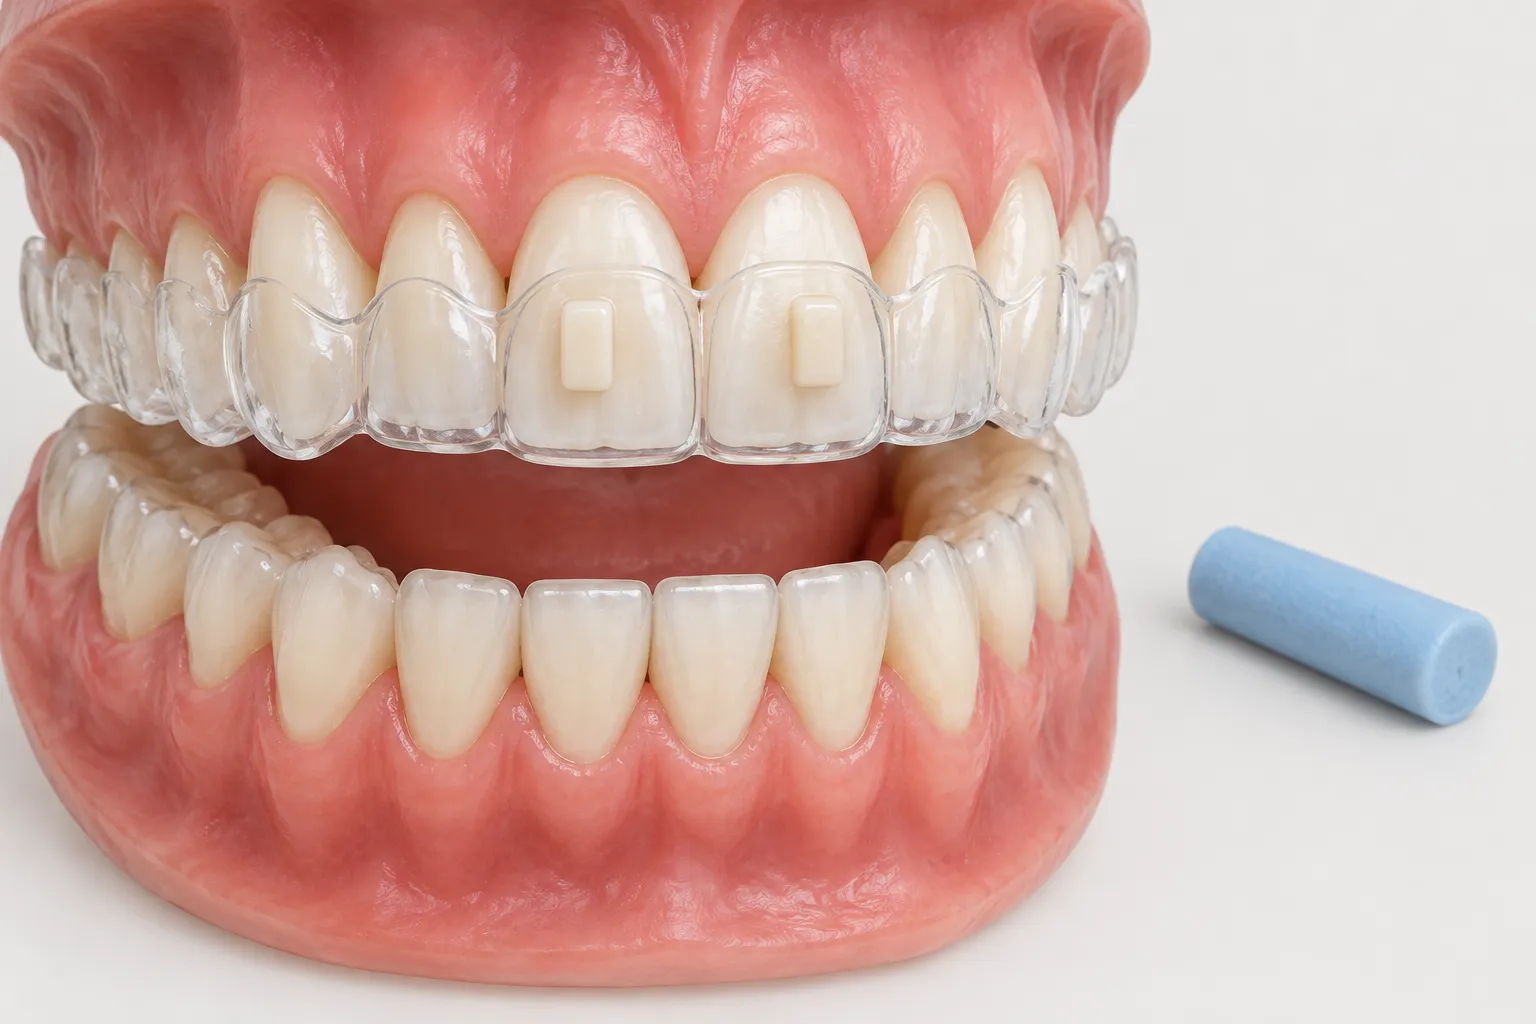
After placing an aligner, bite gently on a chewie over one area, then move it along the arch so the tray seats evenly. Invisalign’s aligner-seater instructions describe moving between front and back teeth or focusing on an area that needs seating. Follow the frequency and technique your orthodontist gives you. Chewies are especially useful with a new tray or a small gap between tray and tooth. They help seat the plastic; they do not replace the planned wear schedule or fix a damaged tray.
Avoid forcing the tray down by biting hard with your teeth alone. Call the practice if a gap persists after using the seating method you were shown, or if the tray rocks or will not go over an attachment. The team can assess a missing attachment or a tooth that is not tracking as planned.
Living with attachments: meals, brushing, and aligner removal
Remove your aligners for meals. The attachments remain on your teeth, where food and plaque can gather around their edges. Before replacing a tray, clean your teeth; brush around each bump with a soft toothbrush and fluoride toothpaste, and floss daily. Follow your orthodontist’s tray-cleaning instructions too. Dark drinks and foods can stain composite or plaque around it, making a bump more visible.
To remove a tray, start at the back teeth and work it free without pulling hard against an attachment. Use the removal method your own orthodontist has demonstrated if it differs. Put the tray in its case while you eat.
If an attachment comes off, continue wearing your trays as directed and tell your orthodontist which tooth has lost its bump. Leave any remaining composite alone; your team can decide if it needs rebonding. For a loose elastic button, call for instructions about the rubber band instead of finding another place to hook it.
When and how are Invisalign attachments removed?
Your orthodontist may remove or change attachments once they have done their job, during a later stage of treatment, or at the end of your aligner treatment. The clinician removes the composite and polishes your tooth. Leave that work to the office rather than trying to pry or file off a bump. If the tooth feels rough afterward, tell the team.
You may notice some sensitivity after the composite comes off. Tell your clinician if it lasts, feels pronounced, or affects one tooth in particular. The end of attachments does not necessarily mean the end of care: you may still need a retainer after aligners.
Invisalign care near Passaic, NJ
During a complimentary consultation at Eisenberger and Meister Orthodontics in Passaic, you can ask whether your Invisalign plan calls for attachments, elastic buttons, or chewies. As an Invisalign Sapphire Provider, the practice offers personalized Invisalign treatments for children, teens, and adults, as well as traditional braces, including metal braces. If you are worried about visibility, ask which teeth need attachments and how the trays will fit over them. Dental Monitoring is also available when it suits the treatment plan.
Communities around Passaic
For families comparing orthodontic care around Passaic and North Jersey, here is a county-by-county list of nearby communities. This is a regional orientation list, not a guarantee that every address is within a 20-mile drive: a driving route varies by starting point, traffic pattern, and road access, and towns at the outer edges can be farther by road.
|
County |
Passaic-area and surrounding communities |
|---|---|
|
Passaic County |
Passaic, Clifton, Paterson, Woodland Park, Little Falls, Totowa, Wayne, Haledon, North Haledon, Prospect Park, Hawthorne, Pompton Lakes |
|
Bergen County |
Garfield, Lodi, Wallington, East Rutherford, Rutherford, Carlstadt, Wood-Ridge, Hasbrouck Heights, Teterboro, Moonachie, Little Ferry, South Hackensack, Hackensack, Rochelle Park, Maywood, Saddle Brook, Elmwood Park, Fair Lawn, Paramus, Ridgewood, Glen Rock, New Milford, River Edge, Teaneck, Bogota |
|
Essex County |
Nutley, Belleville, Bloomfield, Glen Ridge, Montclair, Verona, Cedar Grove, West Orange, East Orange, Orange, Newark, North Caldwell, Caldwell, Fairfield |
|
Hudson County |
North Bergen, Secaucus, Kearny, Harrison, Jersey City, Union City, Weehawken, West New York, Guttenberg, Hoboken |
|
Morris County |
Lincoln Park, Montville, Pequannock, Riverdale, Butler, Boonton, Parsippany-Troy Hills |
|
Union County |
Hillside, Elizabeth, Union, Kenilworth, Roselle Park, Roselle, Springfield |
If you live in North Jersey, schedule a complimentary consultation with Eisenberger and Meister Orthodontics to discuss appearance, daily care, and which treatment makes sense for your teeth. The team can explain the planned attachments tooth by tooth.
FAQ
Is it normal to experience tooth sensitivity after Invisalign attachments are removed?
Mild sensitivity can happen after attachment removal, but persistent or pronounced sensitivity deserves a call to your orthodontist. The composite is removed and the tooth surface polished by a clinician, not by the patient at home.
What are attachments for aligners?
Attachments are small composite shapes bonded to selected teeth. They give the aligner a place to grip so it can apply force for movements such as rotation or vertical movement.
How long do Invisalign attachments take to put on?
Invisalign says placing SmartForce attachments should take around 30 minutes. Your appointment length may differ with the number of attachments and other steps in your visit.
Is 20 attachments a lot for Invisalign?
There is no number that by itself means your case is unusually difficult. The number and position of attachments depend on the specific tooth movements planned, so ask your orthodontist what each group is meant to do.